Paper Punch Santa Embellishment
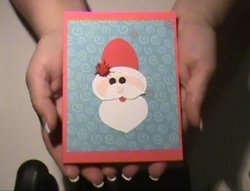
Design your very own Santa face to adorn your handmade holiday cards with this simple tutorial. You can create a cute Paper Punch Santa Embellishment by arranging various cutouts in the shape of Mr. Claus! If you've been wanting to make a craft Santa but weren't sure how to get the right design, these instructions are perfect since they take away all of the guess work! Find out how to make homemade Christmas cards in a few easy steps with this tutorial from craft designer Carlene Eshelman.
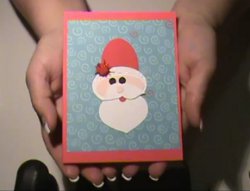
Materials:
- Wide oval punch in red and white cardstock
- Large oval punch in blush cardstock
- Liquid glue
- Glue dots
- Ornament punch in white cardstock
- ¼” hole punch in blush, red and 2 black cardstock
- Bird punch (punch wing 2 times in white)
- Red ½” pom pom
- White liquid glitter (optional)
Instructions:
- Layer oval blush cardstock onto wide oval, towards bottom.
- Glue white ornament cardstock into middle of oval layers.
- Glue 2 white wings together, to form mustache. Glue to top of ornament piece.
- Glue wide red oval to top of blush/white oval layer. Glue to underside of oval layer, not on top. Leave 2/3 showing.
- Glue red circle under bottom of mustache for mouth.
- Glue blush circle to middle of mustache.
- Glue black circles as eyes above mustache.
- Glue red pom pom to left side where red oval meets Santa’s head.
- Place onto card base, or use as an ornament or tag.
Video:
Read Next5 Minute Stitched Christmas Cards
pinkscrapper99 087 2520
Dec 19, 2011
This is so easy and quick to make!! Great as pencil toppers or lollipops!!
Report Inappropriate Comment
Are you sure you would like to report this comment? It will be flagged for our moderators to take action.
Thank you for taking the time to improve the content on our site.

