Swirly Clay Doodle Ornaments
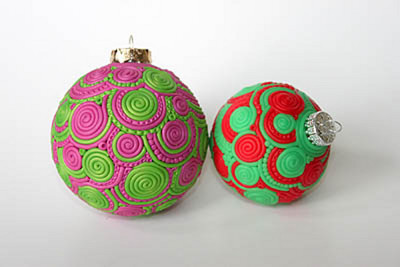
The Swirly Clay Doodle Ornament is an incredibly unique and creative decoration to add to your Christmas tree this year. These DIY Christmas Ornaments will keep you busy for an evening and allow you to unlock your artistic side. You will take very small and thin sections of bright colored clay and lay them over your basic ornament to create a patterned and swirled overlay. These ornaments would make excellent gifts for friends, family, and coworkers because they are so personalized.

Materials:
- Premo! Accents®, 2 oz , Magenta Pearl - 1 block of clay
- Premo! Accents®, Kit, Bright Green - 1 block of clay
- Premo! Sculpey®, Kit, Green - 1 block of clay
- Premo! Accents®, 2 oz , Red Translucent - 1 block of clay
- Sculpey® Clay Extruder
- Sculpey Style and Detail Tools, Set of 3
- Glass ornament
- Baking parchment paper
- Polyester fiber fill
- Small box or round cutter to sit the ornament in
- Craft blade
Instructions:
- Prepare the clay by loading the extruder and extruding in about 12" lengths. Consider settting a TV tray up next to your work table and cover it with baking parchment paper. Lay the lengths of clay on the parchment paper as you create them. Create at least 8-10 lengths of each color.

- Start by wrapping one of the colors a couple of times around the top of the ornament, ending with a small coil of clay.

- Add the second color by cutting the end of the coil at an angle to fit into the space created at the intersection of the first color coil. Use the craft blade to cut the end to match the other intersection.

- Add a second coil of clay with the green color, putting it as close as possible to the pattern. Here's a tip: create your coils flat on a sheet of paper and then transfer them to the ornament.

- Fill the space left between the coils of clay with a small ball of clay and use the small ball tool to press it into place.

- Use a small piece of the baking parchment to gently press the clay coils. This will help them to better adhere to the glass and to create a smoother surface to the ornament.

- Since you are only using two colors of clay, you can add more variety to the pattern by adding lines of color, textured lines of color, and lines of small balls of clay.

- When the ornament is about a third of the way done, bake it for about ten minutes at the temperature specified on the clay package directions. Of course, since the ornament is round, you need to anchor it for baking. Use a small cardboard box and a piece of polyester fiber fill to “nest” the ornament. The fiberfill will NOT burn and it will not adhere to the clay.

- Once the clay is baked and cooled, you can continue with your pattern. Bake the ornament three times, regardless of the size.
- Try to not over-think the pattern but allow it to flow organically. Switch the areas that you are working on frequently.
Read NextDIY Cactus Christmas Tree
Your Recently Viewed Projects
Report Inappropriate Comment
Are you sure you would like to report this comment? It will be flagged for our moderators to take action.
Thank you for taking the time to improve the content on our site.

