Homemade Holiday Gift Packaging
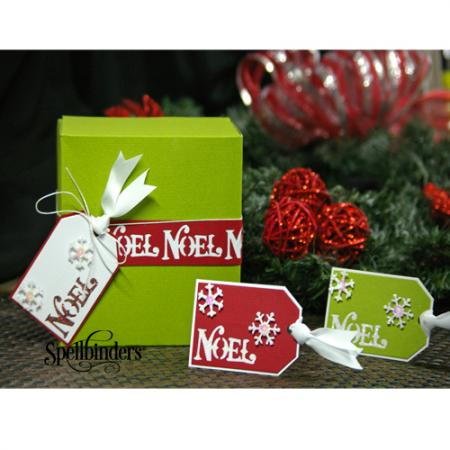
If you want creative gift wrapping ideas so that the presentation of your holidays gifts is just as exciting as what's inside, try this homemade holiday gift packaging tutorial. This gift set is so cute and festive and will look adorable sitting under the tree. Your friends and family will be so touched by the amount of time and thought you put into the entire gift-giving experience. These DIY gift tags and DIY gift boxes are also a great idea because no one will want to throw them away, and they can be reused rather than thrown in the trash like wrapping paper.
Estimated Cost$21-$30
Time to CompleteUnder an hour
Primary TechniquePaper Crafts

HolidayChristmas
Materials List
- S4-434 Holiday Greetings
- SCD-010 Build-a-Tag One
- T-001 Tool 'n One
- GC-001 Spellbinders Grand Calibur Die Cutting and Embossing Machine
- ClearSnap: Glitter
- May Arts: White Ribbon and Iridescent Cord
- Scrapbook Adhesives by 3L: Adhesive Sheet, E-Z Runner Permanent Strips and 3D Foam Squares
- White Cardstock
- Red Cardstock
- Green Cardstock
- Hole Punch
- Box
- Low Tack Tape
For more creative gift packaging ideas, check out these 22 Homemade Gift Wrap Ideas: Bags, Bows, Gift Card Holders and More!
Instructions
-
Trim red cardstock to approximately 3 x 4. Secure with low tack tape (or washi tape). Position cardstock and Holiday Greetings die in the cutting sandwich.
-
Place on base plate with Christmas tree design over edge of base plate. Cover with cutting plate. Run through Grand Calibur Machine. Use Tool N One to help remove paper from die.
-
Place Build-a-Tag One Tag Die over red cardstock cut from Step 2. Secure with low tack tape. Cut/emboss in Grand Calibur machine.
-
Cover a 3 x 4piece of white cardstock with Adhesive Sheet and then adhere over the red NOEL Build-a-Tag One die cut.
-
Adhere the Noel tag to another piece of white cardstock. Trim to leave a small white border.
-
Sprinkle glitter over NOEL where the adhesive is exposed. Press down and shake off excess.
-
With a 1 x 4 piece of white cardstock, cover with adhesive sheet and place over the row of snowflake design on the Holiday Greetings die to cut/emboss.
-
Remove snowflakes from template. Remove adhesive backing and dip in glitter and adhere to tag with 3D Foam Squares. Add sequins to the center of snowflake. Punch hole in the top of the tag, and tie ribbon through.
-
With a 1 x 12 red cardstock, place over NOEL portion of the Holiday Greetings die and cut in Grand Calibur Machine. Remove from template and reposition, continuing to die cut until entire 12 have been cut. Repeat on a second strip if needed for gift box.
-
Adhere 1 x12 white cardstock under the red die cut strip, overlapping the end to add second strip. Wrap around gift.
Read NextMiniature Angel DIY Tree Topper

