Gingerbread Girl Christmas Card
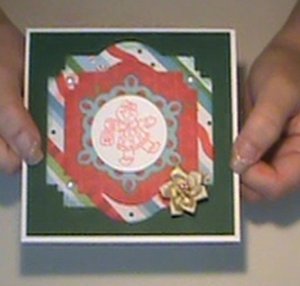
Send a special holiday greeting this year with this Gingerbread Girl Christmas Card! Using stamps and other festive accents you can create a cute homemade Christmas card that's sure to stand out. Get the how-to on this DIY Xmas card right here. Plus be sure to watch the video tutorial for more details!
To see more of Carlene's holiday project ideas head on over to her designer profile page!

Materials:
- Spellbinders labels 22
- Spellbinders fleur de lis accents
- 2 coordinating scrapbook papers
- 1 4 ¾” square cardstock
- 1 8 ½”x11” white cardstock
- Liquid glue
- Gold flower 1 ¾” circle punch
- Bone folder
- 3 small flat,white pearls
- Christmas saying stamp
- Gingerbread girl stamp
- Red inkpad
- Black inkpad
- Scissors
- Paper trimmer
Instructions:
1. Cut white cardstock to 5”x10”. Fold in half to make 5” sqaure card.
2. Glue 4 ¾” cardstock down as first layer.
3. Cut scrapbook paper “A” with the largest labels 22 die. Cut second largest die with the 2nd coordinating scrapbook paper “B”. So you have two different papers for each diecut.
4. Optional: Take small sponge and distress edges of your papers with matching inkpad.
5. Glue largest diecut down onto white cardstock, then next diecut on top of that one. You should have 3 layers now.
6. Cut round doily using fleur de lis diecut. Center and glue on top of layered papers.
7. Stamp gingerbread girl stamp with red ink on to extra piece of white cardstock.
8. Punch out gingerbread image using 1 ¾” circle punch.
9. Glue circle to your previous paper layer.
10. Glue gold flower to corner of layered papers.
11. Stamp Christmas saying inside of card using black inkpad.
12. Glue 3 pearls onto remaining corners of card.
Video:
Read Next5 Minute Stitched Christmas Cards
Your Recently Viewed Projects
Report Inappropriate Comment
Are you sure you would like to report this comment? It will be flagged for our moderators to take action.
Thank you for taking the time to improve the content on our site.

