Pumpkin Patch Board Game
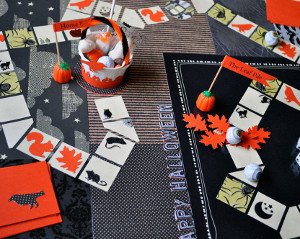
When this project is done, the fun has just begun! With this Pumpkin Patch Board Game, Trick or Treating isn't the only way you'll be getting candy this Halloween. The winner of this board game gets candy too. This Halloween craft is easy to make and you can use it again and again. Get the kids in the spirit of the spooky holiday before Halloween arrives with this board game and keep the fun going way after it passes. This craft is as fun to create as it is to play!

Materials:
- An assortment of Halloween-themed papers
- Orange cardstock
- 24” x 30” sheet of chipboard or matt board
- Halloween stickers
- Paper Glue
- Dimensional adhesive dots
- Toothpicks
- Candy pumpkins
- A pair of dice
- Paper candy/nut cup
- Assorted Halloween candy
- Black fine-tip marker
Instructions:
1. Gather several coordinating sheets and scraps of Halloween-themed paper. Small patterns work well.
2. Cut the paper into smaller squares and rectangles and collage them on a 24” x 30” sheet of chipboard or matt board to create the background for the game.
3. Use paper glue to attach these pieces to the board.

4. Next, punch out the following:
- 40 – 50 squares (in a solid colors and Halloween paper)
- 5 – 7 circles (3 in orange card stock, the rest in a Halloween paper)
- 3 hats
- 15 squirrels
- 15 crows
- 8 – 10 leaves
5. Take three orange circles and punch out a face using the Laughing Jack punch.
6. Glue the jack-o-lanterns down in the bottom right corner of the game board, and add their hats.
7. Add a border using the Happy Jacks Border Punch.

8. Make a path with the squares and circles, covering as much of the board as possible.
- Trim a corner off a square to make a bend in the path. Circles also work as corners. End the path with a large circle.
9. Glue all the pieces down. Randomly glue down a few squirrels, leaves, and crows on the squares.
10. In the remaining squares and circles, add a few Halloween stickers.
11. Embellish the board using Halloween stamps and stickers.
12. Use punched leaves to create a “leaf pile” on the game path.
13. Place the "leaf pile" within the first third of the path.
14. Adhere the leaves with dimensional adhesive dots.

15. Make two sets of game cards– one squirrel set and one crow set. Use the paper trimmer to cut them into 3” x 4” rectangles. Print them from the computer, or write each card by hand.
16. Each card will have instruction to move ahead or move back in the game. Below are a few ideas:
- Neighbors are passing out full-sized candy bars, advance 3 spaces.
- Your trick-or-treat bag has a hole! Go back five spaces to pick up the pieces you dropped.
- Go jump in the leaf pile and lose your turn.
- Scared by zombies! Go back 4 spaces.
- The lights are on but no one’s home. Skip ahead two spaces.
- Someone smashed your pumpkin! Go back to the patch.
17. Once the text has been added, glue either a squirrel or a crow to the front of each card.

18. Create three little flags using a scrap of cardstock, glue, and a toothpick. Label them “pumpkin patch”, “leaf pile” and “home”.
19. Use a candy pumpkin as a stand and insert the toothpick into the stem.

20. Trim a candy/nut cup. Attach a chenille handle with hot-glue, add a few punched Halloween shapes or borders, stick on some stickers and then fill the cup with candy.

21. To set up the game, place the pumpkin flags in their appropriate spots, stack the squirrel and crow cards in the corners, and put the candy cup on the “home” space.
22. Select a few candies to use as game pieces – candy corn, eye balls or gummy bugs.

Instructions to the Game:
1. Simply roll the dice and move ahead.
2. If you land on a leaf, you’re sent back to the leaf pile.
3. If you land on a squirrel or crow, take the appropriate card, and follow the instructions on the card.
4. The first one to “home’ wins the candy prize waiting there.
Read NextMilk Jug Ghosts

