Decoupage Gift Boxes
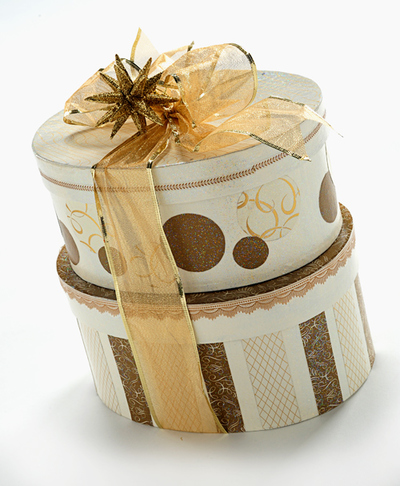
If you want to give a gift in a truly special way, try making Decoupage Gift Boxes. The recipient will not only get a thoughtful gift, but also beautiful homemade decoupage boxes to use in a variety of ways. Consider matching the boxes to the Christmas decor of your giftee, making them the perfect centerpiece for a holiday tables. This easy tutorial shows how to decoupage a box using pretty scrapbooking paper, Mod Podge, and a little time.

Materials:
- FolkArt ® Acrylic Colors - Ivory White, 2 oz.
- Mod Podge ® Sparkle, 2 oz.
- 2 paper mache boxes
- Paper pad by Martha Stewart Create™
- 2 yards gold wire edge ribbon 2 ½” wide
- Sparkle gold Christmas ornament
- Icing border stickers (four 12” stickers)
- Scissors
- Ruler
- Medium paintbrush
Instructions:
Small Box:
- Paint top and bottom of box Ivory White.
- Cut 2”, 1 ½”, and 1” circles of solid and printed papers. Decoupage circles to bottom of box.
- Put icing border sticker around lid as shown.
- Cut light color paper to fit top of box. Apply paper to top of box with Sparkle Mod Podge. When dry, apply a second coat.
- Tie a bow and hang a small Christmas ornament at the top. Refer to photo for placement.
Large Box:
- Paint top and bottom of boxes Ivory White. When dry, apply a second coat if necessary.
- Paint box with one coat of Sparkle Mod Podge.
- Cut paper strips 1 3/8” and 1” as shown. One dark and one light. Decoupage around the bottom of the box leaving ½” between stripes. When dry, apply 1 coat of Sparkle Mod Podge.
- Cut an oval from dark paper and glue to top of lid. Apply icing border sticker around lid. Apply 1 coat of Sparkle Mod Podge.
Read NextHoliday Homemade Playdough Recipe

