3D Photo Memory Trees
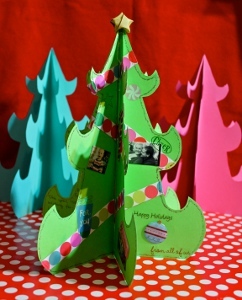
Put your favorite memories on display during the holidays with these cute 3D Photo Memory Trees! These homemade Christmas crafts are such a simple and cheery way to decorate for the holidays in a way that's personal to your family. Learn how to make these easy Christmas table decorations with this step-by-step tutorial from MadebyMarzipan.
Find more projects and tutorials from craft designer Maureen Wilson.

Materials:
- 3 sheets solid cardstock (8.5" x 11")
- Free tree template
- Glue dots
-
Stickers, patterned paper, rub-ons (optional)
Instructions:
-
Print the free pattern. If your printer can handle cardstock, you can print the template directly onto your paper and save yourself some time. Otherwise, you'll need to cut out the pattern.
-
Fold your three sheets of cardstock in half lengthwise. The straight line of the tree should be along the fold line. Cut out three trees.
-
If you'd like to decorate your tree, it's best to do it now. I'm adding small photos, as well as these stickers and rub-ons that cost $1 each at my local scrapbook store. I'm also decorating the edge of my tree with a bit of pink glitter glue. Finally, I'm writing each family member's wish list on the tree.
-
Once your tree is decorated, it's time to assemble it. Lay one tree piece down flat, with the spine of the fold poking up (a mountain fold). Add glue dots directly on top of the center fold.
-
Fold another tree piece in half, and lay it on top of the flat one. Make sure the edges of both trees are lined up evenly.
-
Repeat on the other half of the tree. Unfold and gently press the center of each page so that they spread apart.
Making the Star:
If you'd like a topper for your little tree, you can make a puffy star out of paper. Here's how:
-
Cut a strip of paper that's about 12 inches long by 1/2 inch wide. It's best to use a thin, flexible paper rather than stiff cardstock. Even magazine paper will work.
-
Fold one end of the strip to create a loop, with one long end and one short.
-
Feed the short end of the strip into the loop, and pull gently into a knot. Be careful not to rip your paper! Once it's pulled tight, the paper will form a shape that looks like a pentagon.
-
Tuck the remainder of the short end up inside the fold. You can trim it if you have to, but you shouldn't have much left over.
-
Wrap the pentagon in the remainder of the strip. Line up the strip with the edge of the pentagon as you go. Don't wrap too tightly or add creases, because then your star won't puff out. Continue wrapping until you have a tiny bit of strip left.
-
Tuck the remainder of the strip into the fold.
-
Crease each side of the pentagon with the blunt side of your scissors. Then pinch the points of the star to give them definition.
- Poke a hole in the bottom of the star, and add it to the top of your tree.
Video:
Read NextEasy Angel Ornament
Your Recently Viewed Projects
Made By Marzipan
Dec 05, 2011
I saw beautiful paper trees like this for sale at Ikea... I loved them so much I nearly bought them, then I realized I could probably make them myself! I'm glad I did because it was such a fun and inexpensive project!
Report Inappropriate Comment
Are you sure you would like to report this comment? It will be flagged for our moderators to take action.
Thank you for taking the time to improve the content on our site.

