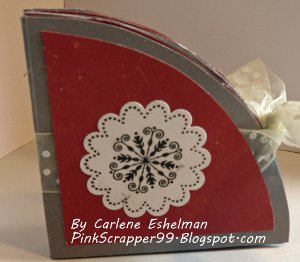
Happy 4th of July Pop Up Cards
 Learn how to make pop up cards for the Fourth of July in a video tutorial from craft designer Carlene Eshelman. These Happy 4th of July Pop Up Cards make great decorations for Independence Day parties. They can easily stand alone on a buffet table!
Materials:
- 4 red 7” circles
- 2 blue 7” circles
- 1 red striped 7” circle
- Flower punch
- Liquid glue
- Double sided adhesive
- Bone folder
- Score board
- Scissors
- Ruler
- Pencil
- 24” ribbon
Instructions:
- Using bone folder and score board, score all circles in half, then in half again. This will form 4 quarters of the circle. Do this for all circles.
- Take blue circles and use score lines to cut into quarters. You will have 8 pieces.
- Take red striped circle and cut into quarters, then cut into eighths. You should have 8 pieces.
- Take red circles and fold at score lines. Identify one of the score lines, then cut a slit from the outside of the circle to the middle of the circle.
- Locate the score line to the right of the circle, then draw a line 1/2” away from the scored line. Cut this line. Trim edges at a 45 degree angle to create a 1/2” tab. Repeat for all red circles.
- Take red circle and fold the quarter to the left of the tab in half. This should be a mountain fold, so that the fold is pointing upwards. Repeat for all red circles.
- Place adhesive on top of tab of red circle, then connect to left of circle. Repeat for all red circles.
- Trim 1/4” away from right and left sides of the blue, and red striped circles. These will be your layering pieces.
- Use blue, and red striped pieces to decorate your quarter panels.
- Arrange panels together to form a circle. The backs should be facing eachother.
- Decide which will be your front panel and back panel. Start at front panel, and fold panel down flat. Place adhesive on the right side of the front panel. Attach to the second panel. Continue until all panels are connected.
- Place adhesive in the center, of the left side of the front panel, and the right side of the back panel.
- Lay ribbon over the adhesive and adhere down.
- Decorate a blue panel as your “cover”, and as the “back” of your card. Glue cover, and back down over ribbon.
- Tie a bow to close your card. When you open card, tie a bow to keep it open.

Video:
Read NextAmerican Flag Wooden Heart
Your Recently Viewed Projects
PatsTreasures
Jun 22, 2012
I love this project. I also love the video from Carlene. She's just amazing and you're lucky to have her as a designer. :) Thanks for the inspiration!
Report Inappropriate Comment
Are you sure you would like to report this comment? It will be flagged for our moderators to take action.
Thank you for taking the time to improve the content on our site.

